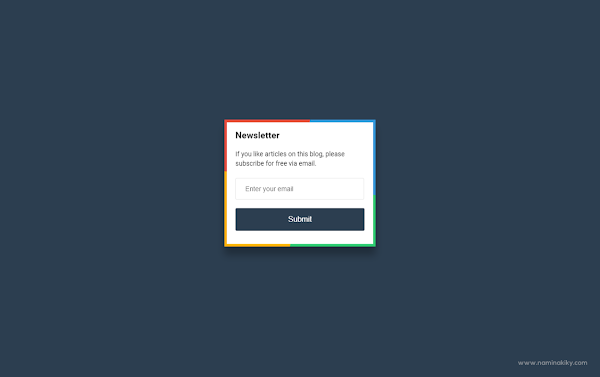
Here Namina will give tips on How to Install the Subscribe Box with Animation as in the In SEO Special Ramadan template. Display Subscribe Box is given this color animation with the aim that visitors are more interested so that the interaction between visitors and the blogs he visits will be well-formed.
Okay, for those of you who are interested please follow the steps below.
How to Install a Subscribe Box with Animation
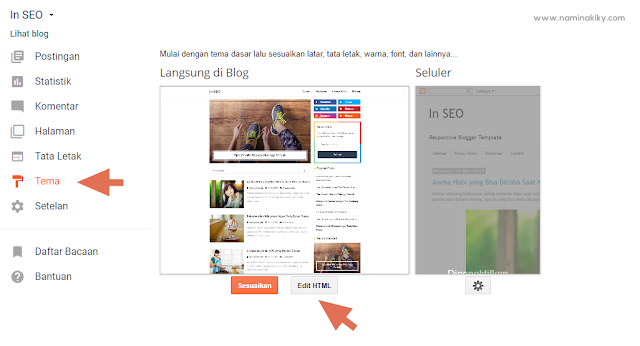
First, open the Blogger page> Select the Themes menu and click the Edit HTML button

<style type='text/css'>
/* Subscribe Box */
@keyframes rotate{100%{-webkit-transform:rotate(1turn);transform:rotate(1turn)}}
.rainbow{position:relative;z-index:0;overflow:hidden;padding:3px}.rainbow::before{content:'';position:absolute;z-index:-2;left:-50%;top:-50%;width:200%;height:200%;background-color:#2ecc71;background-repeat:no-repeat;background-size:50% 50%,50% 50%;background-position:0 0,100% 0,100% 100%,0 100%;background-image:linear-gradient(#2ecc71,#2ecc71),linear-gradient(#fbb300,#fbb300),linear-gradient(#e74c3c,#e74c3c),linear-gradient(#3498db,#3498db);animation:rotate 8s linear infinite}.rainbow::after{content:'';position:absolute;z-index:-1;left:5px;top:5px;width:calc(100% - 10px);height:calc(100% - 10px);background:#fff}#HTML99{padding:0}#HTML99 h2{color:#222;padding:0}#HTML99 h2:before{display:none}.subscribe-wrapper{color:#222;line-height:20px;margin:0;padding:20px}.subscribe-form{clear:both;display:block;margin:10px auto;overflow:hidden}.subscribe-wrapper p{margin:0;font-size:14px}form.subscribe-form{clear:both;display:block;margin:10px 0 0;width:auto;overflow:hidden}.subscribe-css-email-field{background:#fff;color:#222;margin:0 0 18px;padding:12px;width:100%;border:1px solid rgba(0,0,0,0.1);outline:0;font-size:14px;text-indent:10px;line-height:20px;border-radius:3px;transition:all .6s}.subscribe-css-email-field:hover,.subscribe-css-email-field:focus{border-color:rgba(0,0,0,0.3)}.subscribe-css-button{background:#2c3e50;color:#fff;cursor:pointer;font-weight:500;padding:7px;text-transform:none;width:100%;border:none;font-size:16px;border-radius:3px;transition:all .3s}.subscribe-css-button:hover{background:#34495e}
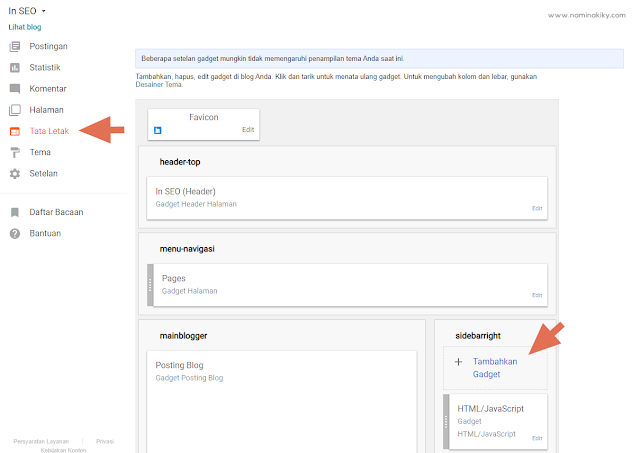
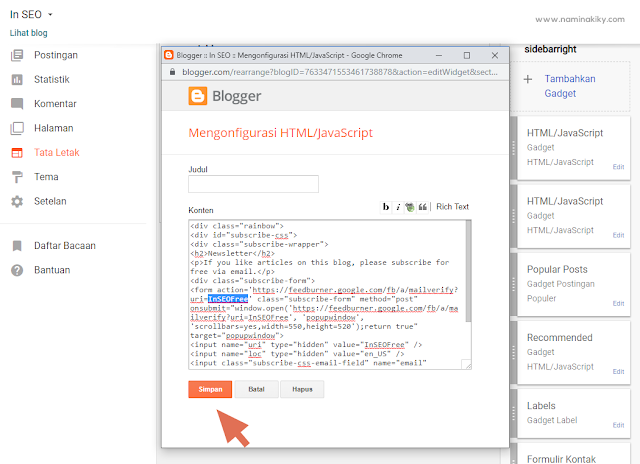
</style>The next step, add this code inside the new widget in the blog Layout menu

<div class="rainbow">
<div id="subscribe-css">
<div class="subscribe-wrapper">
<h2>Newsletter</h2>
<p>If you like articles on this blog, please subscribe for free via email.</p>
<div class="subscribe-form">
<form action='https://feedburner.google.com/fb/a/mailverify?uri=InSEOFree' class="subscribe-form" method="post" onsubmit="window.open('https://feedburner.google.com/fb/a/mailverify?uri=InSEOFree', 'popupwindow', 'scrollbars=yes,width=550,height=520');return true" target="popupwindow">
<input name="uri" type="hidden" value="InSEOFree" />
<input name="loc" type="hidden" value="en_US" />
<input class="subscribe-css-email-field" name="email" autocomplete="off" placeholder="Enter your email"/>
<input class="subscribe-css-button" title="" type="submit" value="Submit" />
</form>
</div>
</div></div></div>
ay attention to the code marked, replace all with your blog's FeedBurner address. If you don't have a feedburner address, you can visit this link https://feedburner.google.com/fb/a/myfeedsand add your blog.

After that click the Save button.
Next, return to the Themes menu> Click the Edit HTML button and find this code

Click the Save theme button and finish.
To see the results click on the sample display of the Subscribe Box from Codepen.
Okay, that's all from Namina for How to Install a Subscribe Box with Animation. Thank you for visiting and hopefully useful.

Post a Comment